![]()

How to Preserve Flowers: A Comprehensive Guide to Eternal Blooms
Introduction
Flowers are nature’s fleeting masterpieces, bringing joy and beauty into our lives. But what happens when that vibrant bouquet starts to wilt? Instead of letting those cherished blooms fade away, why not preserve their beauty for years to come? In this guide, we’ll explore various methods to preserve flowers, ensuring you can hold onto precious memories—be it a wedding bouquet, a thoughtful gift, or simply the beauty of nature. From air drying to resin encapsulation, discover the art of flower preservation. Each method has its unique charm and outcome, allowing you to choose the one that suits your style. Air drying is simple: just hang your flowers upside down and let gravity do the work. Pressing offers a flat, artistic way to maintain those delicate petals. Silica gel drying preserves the flowers’ original shape and color, while microwave drying speeds up the process without sacrificing vibrancy. For the ultimate keepsake, resin preservation encases your blooms in a glossy finish, making them last forever. As you read on, you’ll learn how to select the best flowers for preservation. Timing is crucial, so picking them before they fully open ensures they retain their beauty. We’ll also cover essential care tips to keep your flowers fresh before preservation. By the end of this guide, you’ll be equipped to tackle each preservation method with confidence, turning your dried blooms into lasting reminders of cherished moments. So grab those wilting flowers and let’s get started on this delightful journey of preserving nature’s beauty!
Summary
In this article, we’ll discuss the best practices for preserving flowers, covering a variety of techniques that cater to different preferences and skill levels. You’ll learn about the importance of selecting the right blooms and the optimal timing for preservation. We’ll discuss popular methods such as air drying, pressing, silica gel drying, microwave drying, and resin preservation. Each method will be broken down into easy-to-follow steps, ensuring you can successfully keep your flowers looking beautiful. Choosing the right flowers is key. Sturdy blooms like roses, lavender, and baby’s breath are perfect candidates for preservation. We’ll also highlight the optimal time to pick your flowers for the best results. Additionally, we’ll provide creative project ideas for displaying your dried flowers and share tips for maintaining their color and texture. By the end of this comprehensive guide, you’ll be inspired to try your hand at preserving flowers and creating lasting keepsakes. Whether you want to cherish the memories from a special day or simply enjoy the beauty of nature, this guide will empower you to keep your blooms vibrant for years to come.
Methods of Preserving Flowers
1. Selecting the Right Flowers
When preserving flowers, the choice of blooms is crucial. Some flowers hold up better than others during the preservation process. Roses, lavender, and baby’s breath are top candidates. They retain their color and structure beautifully over time. Roses, with their lush petals and romantic allure, provide a stunning keepsake. Lavender adds a dash of color and fragrance, while baby’s breath offers an airy touch. Timing is everything in flower preservation. It’s best to cut flowers just before they fully bloom. Why? Well, fully open flowers tend to wilt more quickly. Picking them a bit early ensures they keep their vibrant colors longer. Think of it as taking a snapshot of their beauty at its peak! After harvesting, handle your flowers with care. Remove any excess foliage. This helps keep moisture levels down. Place them in water until you’re ready to start the preservation process. A little TLC goes a long way in maintaining their freshness. Treat your blooms like royalty before they become everlasting memories!
Speaking of preserving flowers, if you’re serious about it, you might want to check out a Dried Flower Press Kit. This handy tool makes pressing flowers easier than ever, ensuring you get those perfect, flat beauties without the hassle of searching for heavy books!
2. Air Drying
Air drying is one of the most popular methods for preserving flowers. It’s simple and effective—just hang your flowers upside down and let gravity do its magic! Why does this method work so well? By hanging the blooms, moisture drains downwards, helping to retain their shape. To get started, remove any excess leaves and trim the stems to your desired length. This not only looks prettier but also reduces moisture retention. Bundle a few flowers together and tie them with string or rubber bands. Hang them upside down in a dark, dry area with good air circulation. A closet or a basement works wonders! As for timing, patience is key. Let them hang for about two to four weeks. You’ll want to check on them occasionally to ensure they’re drying evenly. Avoid sunlight to prevent fading; that vibrant color is what you’re after! For better results, consider using an elastic band to attach them to a hanger. This allows for flexibility as the flowers dry. Pro tip: Ensure good air circulation around your flowers. This helps prevent mold from forming. You want your flowers to be preserved, not turned into a science experiment!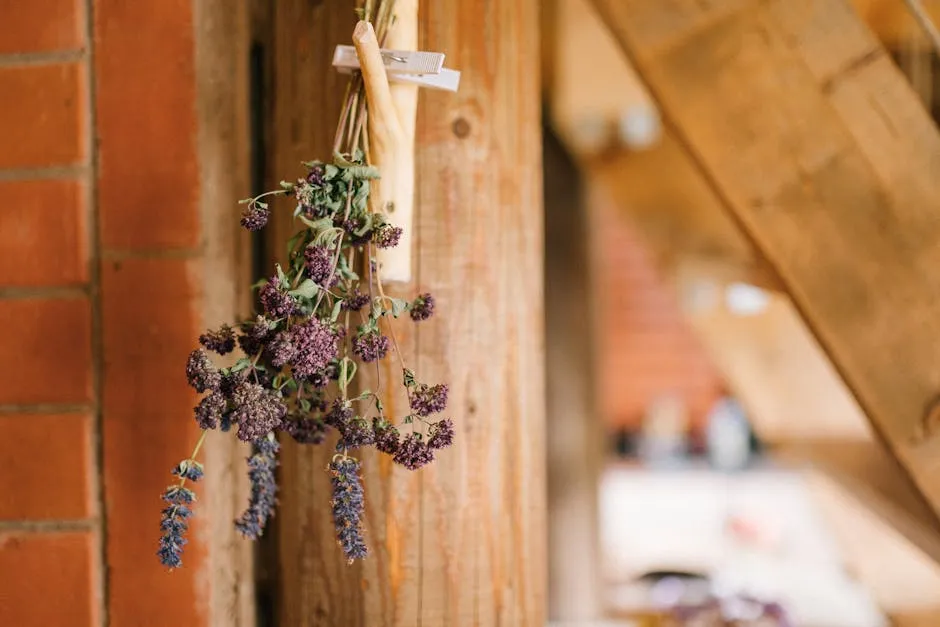
3. Pressing Flowers
Pressing flowers is an age-old technique that is perfect for creating beautiful art pieces and keepsakes. It allows you to capture the delicate beauty of your blooms in a flat format. Plus, it’s a fantastic way to preserve memories! Start by selecting your flowers. Thin, flat flowers like daisies or pansies press beautifully. If you’re using a flower press, follow the provided instructions. No press? No problem! Simply sandwich the flowers between sheets of parchment paper and place them in a heavy book. The more weight, the better! Once arranged, leave them to dry for about two to four weeks. Check back weekly to see how they’re doing. Remember, patience is a virtue! After they’re fully dried, you can get creative. Use pressed flowers in scrapbooking, greeting cards, or frame them for stunning wall art. Want to add a personal touch? Create bookmarks or decorative coasters with your pressed flowers. The possibilities are endless! Pressing flowers not only preserves their beauty but also transforms them into unique décor items that tell a story.
If you’re looking to enhance your pressed flower art, consider picking up a Pressed Flower Art Book. It’s packed with inspiring ideas and techniques to take your flower pressing game to the next level!
4. Drying with Silica Gel
Using silica gel is a fantastic way to preserve flowers while maintaining their vibrant colors and 3D shapes. Unlike traditional drying methods, silica gel absorbs moisture without flattening the flowers. This technique is perfect for those who want to keep their blooms looking as fresh as possible. Steps: 1. Prepare a Container with Silica Gel: Start by selecting a suitable container, like a plastic storage box. Pour a layer of silica gel into the bottom, about one to two inches thick. This will serve as the base for your flowers. 2. Arrange Flowers and Cover Completely: Choose flowers that are fresh and have minimal moisture, such as roses or daisies. Gently place the flowers upright in the silica gel, ensuring they don’t touch. Once they’re in position, carefully pour more silica gel over the flowers until they are completely covered. Make sure to fill any gaps to avoid any part of the flower being exposed to air. 3. Leave to Dry for Several Days, Checking Regularly: Seal the container tightly to keep moisture out. After about three to seven days, check the flowers to see if they’re dry. The silica gel will do its job, but it’s wise to be patient. If they’re not fully dry yet, give them more time. Precautions: While silica gel is an effective drying agent, it’s essential to handle it with care. Always wear gloves and a mask when working with silica gel. The fine particles can be irritating if inhaled or if they come into contact with skin. It’s also crucial to keep silica gel away from children and pets, as it can be a choking hazard. If you’re using a colored silica gel, be aware that it may stain surfaces, so work on a protected area. Using silica gel is a simple yet effective way to keep your flowers looking stunning for years. This method is perfect for preserving sentimental blooms and creating beautiful displays. So gather those vibrant flowers, and let’s get preserving!To make your silica gel drying process even smoother, check out this Silica Gel for Flower Preservation. It’s a game-changer for keeping your blooms looking fresh!
5. Microwave Drying
Microwave drying is the quickest way to preserve flowers while keeping their colors intact. This method is perfect for those who want to save time without sacrificing beauty. Here, we’ll show you how to use a microwave to dry your blooms effectively. Steps: 1. Place Flowers Between Paper Towels and Microwave in Short Intervals: Start by selecting the flowers you’d like to preserve. Place them between two sheets of paper towels on a microwave-safe plate. This will help absorb moisture and protect the flowers. Set your microwave to low power or defrost mode. 2. Alternatively, Use Silica Gel in a Microwave-Safe Container: If you have silica gel, layer it in a microwave-safe container. Place the flowers on top and cover them with more silica gel. This method can yield even better results! 3. Monitor Closely to Avoid Burning: Heat the flowers in 30-second intervals, checking in between. Depending on the type of flower, this process typically takes about 1-3 minutes. Be cautious, as overheating can result in burnt flowers. Once they feel dry, carefully remove them from the microwave. Considerations: Microwave drying is fast, but it requires constant supervision. The key is to strike a balance between drying quickly and preventing damage. Some flowers may dry better than others, so keep an eye on their progress. Additionally, remember that while this method is efficient, it can alter the shape of delicate blooms. So, choose your flowers wisely to ensure the best results. By using the microwave, you can preserve your favorite blooms while retaining their vibrant colors. This method is not only quick but also effective, making it a go-to for flower preservation enthusiasts!
6. Resin Preservation
Preserving flowers in resin offers a creative and artistic approach to keeping your blooms forever. This method encases flowers in a glossy finish, turning them into beautiful keepsakes or decorative items. Steps: 1. Prepare Dried Flowers and a Silicone Mold: Start with dried flowers, ensuring they are completely moisture-free. Choose a silicone mold that suits your desired shape, whether it’s a coaster, pendant, or decorative piece. 2. Mix and Pour Resin, Ensuring Flowers are Positioned Correctly: Follow the manufacturer’s instructions for mixing the resin. Pour a thin layer into the mold and gently place the flowers where you want them. Use tweezers for precise positioning. 3. Allow Curing and Demold After Specified Time: Once the flowers are arranged, pour more resin to cover them completely. Allow the resin to cure based on the product instructions, usually 24-48 hours. Once cured, gently remove the resin piece from the mold. Creative Ideas: Resin-preserved flowers can be used in various ways. Consider creating jewelry, such as pendants or earrings, to wear a piece of nature with you. Alternatively, use them as decorative items in your home, like coasters or paperweights. The possibilities are endless! Using resin not only preserves your flowers but also turns them into stunning pieces of art. So gather those beautiful blooms and get creative!
If you’re ready to dive into resin crafting, don’t forget to grab a Flower Preservation Resin Kit. It’s perfect for making those creative projects come to life!
Creative Projects with Dried Flowers
Dried flowers are not just a way to preserve memories; they can also be the centerpiece of creative projects! Let’s explore some delightful ideas to turn your preserved blooms into stunning displays and gifts that will warm hearts.
Dried Flower Arrangements
Creating beautiful displays with dried flowers is a fantastic way to showcase their charm. Start by selecting a variety of dried blooms, such as lavender, roses, and eucalyptus. These sturdy flowers hold their shape and color well, making them perfect for arrangements. To begin, choose a vase or container that complements your decor. Arrange the flowers in a way that highlights their unique shapes and colors. Consider layering taller blooms in the back and shorter ones in the front for depth. To add a personal touch, incorporate twigs or branches for an organic feel. Dried flower arrangements can brighten any room and serve as lasting reminders of special occasions.
Potpourri
Transform your dried flowers into delightful potpourri blends! This aromatic project not only brings a lovely fragrance to your home but also adds an artistic touch to your decor. To create potpourri, gather dried petals from roses, lavender, and perhaps some citrus peels for a zesty kick. Mix the dried flowers with essential oils to enhance the scent. You can use a mix of your favorite oils, like vanilla and sandalwood, for a relaxing aroma. Place your blend in a decorative bowl or sachet, and voilà! You’ve got a charming piece that can freshen up any space or make a thoughtful gift.
To make your potpourri even more delightful, consider adding Essential Oils for Potpourri. They can elevate your mixes and make your home smell heavenly!
Wreaths
Seasonal wreaths made from preserved flowers are a wonderful way to celebrate nature’s beauty. Whether it’s spring blooms or autumn foliage, wreaths can be customized to fit any occasion. Start by gathering your dried flowers and some sturdy wire or a grapevine base. Begin attaching the flowers to the base, layering them to create a full look. Feel free to mix and match colors and textures for a unique design. Once complete, you can hang your floral masterpiece on a door or wall, welcoming guests with a touch of nature.
Gift Ideas
Dried flowers make for unique and heartfelt gifts! Create personalized bookmarks by gluing a few dried blooms onto cardstock. Laminate them for durability, and you’ve got a lovely present for book lovers. Another charming idea is to craft greeting cards using pressed flowers. Simply attach dried petals to blank cards, and write a heartfelt message inside. This thoughtful touch will surely bring a smile to anyone’s face. These creative projects not only celebrate the beauty of dried flowers but also allow you to express your artistic side. Dive into these fun activities, and let your imagination bloom!
Tips for Maintaining Preserved Flowers
To keep your dried flowers looking vibrant and beautiful, follow these essential tips. The right care ensures your preserved blooms stay stunning for years to come.Storage Solutions
Proper storage is key to maintaining dried flowers. Keep them in airtight containers to protect them from dust and moisture. A cool, dark place is ideal for preventing fading. Avoid areas with high humidity, as this can lead to mold growth. For larger arrangements, consider using a glass cloche or display case. This not only protects the flowers but also turns them into a decorative piece. Decorative Glass Cloche for Displaying Dried Flowers is a great option for showcasing your beautiful creations!
Avoiding Color Fading
Sunlight is a common culprit for color fading in preserved flowers. To keep those vibrant hues intact, avoid placing them in direct sunlight. Instead, choose locations with indirect light or use sheer curtains to filter the sunlight. If displaying flowers on a windowsill, rotate them occasionally to ensure even exposure to light. This simple step can help maintain their color and beauty.
Using Hairspray
A light coat of unscented hairspray can be your secret weapon! This technique helps to seal the flowers and protect them from crumbling. Hold the hairspray at a distance and mist the flowers lightly. Be cautious not to overspray, as too much product can create a sticky residue. After applying, allow them to dry completely before moving them. This quick trick can extend the life of your dried flowers significantly!Conclusion
Preserving flowers is a beautiful way to commemorate special moments and keep nature’s beauty close at hand. With these techniques, you can create stunning keepsakes that last for years. Whether you choose to air dry, press, use silica gel, or encapsulate your flowers in resin, each method offers a unique way to capture the essence of your favorite blooms. Imagine the joy of looking at those vibrant flowers years later, reminding you of love, friendship, or a special occasion. The effort you put into preserving your blooms is worth every moment. Not only do you get to keep a physical memory, but you also unleash your creativity in the process. So, embrace your artistic side and start your flower preservation journey today! Gather those wilting blooms and transform them into lasting treasures that will brighten your space and heart for years to come. Happy preserving!FAQs
What flowers are best for preserving?
When it comes to preserving flowers, some varieties stand out. Roses, lavender, and baby’s breath are top choices. These blooms retain their color and structure well, making them perfect candidates for drying. Sturdy petals and lower moisture content are key attributes. Avoid delicate flowers like hydrangeas or peonies, as they can get mushy during preservation.
How long does it take to preserve flowers using different methods?
The time varies based on your chosen method. Air drying typically takes two to three weeks, while pressing might require a week or more. Silica gel drying can take three to seven days, and the microwave method can be done in just a few minutes. Each method has its charm, so pick one that suits your timeline!
Can I preserve flowers from my wedding bouquet?
Yes, you absolutely can! Wedding flowers are often rich in sentimental value. For the best results, start the preservation process as soon as possible. Air drying or using silica gel are popular options. Consider professional services for a polished finish if you’re short on time or feel a bit overwhelmed.
How do I avoid mold on dried flowers?
Monitoring moisture levels is crucial during the drying process. Make sure to hang flowers in a well-ventilated area with low humidity. Avoid direct sunlight to prevent fading, and check your flowers regularly. If you notice any moisture, consider moving them to a drier location.
Can I use fresh flowers for resin preservation?
It’s essential to dry flowers before using them in resin. Fresh flowers can rot and discolor in resin, ruining your beautiful project. Dry them thoroughly using your preferred method prior to encapsulation. This ensures that your preserved flowers maintain their charm and vibrancy within the resin.
Please let us know what you think about our content by leaving a comment down below!
Thank you for reading till here 🙂
For tips on how to grow beautiful blooms like roses, check out Tips for growing award-winning roses organically.
All images from Pexels


